
Hopping from rug to rug on a cold day is something we’ve all done. Those cold floors would send chills from your feet, all the way up to your skull. Heated floors, though they’ve been around for awhile, seemed to only be possible for the rich and famous. But now, as these products have become more common, you can buy most of the materials from your local hardware store and install heated flooring yourself. Using the Schluter Ditra Heat Floor Warming System, any home owner can have the pleasure provided by warm floor tiles. And thanks to Deeplysouthernhome.com, we all know how to install heated flooring easily!

How To Install Heated Flooring
You’ll need to order the heating cables, uncoupling membrane, power modules, and thermostat control panel.

This system requires a dedicated circuit. We also recommend having a licensed electrician to test the system once it has been installed.
1. Have an electrician come out to your house to prepare your electric panel before you install the floor heater. The electrician will have to create a dedicated circuit. Have the electrician test the wires before you install the system.
2. Begin the install. Ensure your substrate is level and clean before getting to work.
3. Place the Ditra membrane on the floor and cut it to fit the entire floor. As you lay the membrane, line up the “lugs” (waffles) so that the heating cables will be able to run along the membrane without interruption.
4. Mix and set up thinset. This usually takes between five and ten minutes. Follow the instructions on the packaging. It should be the consistency of a thick pancake batter.
5. Lift sections of the Ditra membrane and clean the area beneath the membrane again to remove any remaining debris. Wipe the sub floor with a wet rag to prep the surface for mortar.
6. Apply thinset to the sub floor using the flat side of your trowel. (If you are installing over plywood you need to use modified thinset, for concrete you will use unmodified thinset.)

How To Install Heated Flooring
7. Once you’ve laid the thinset with the flat side of the trowel and evened things out, use the notched side to create grooves in the thinset. This will help the membrane to adhere better.
8. Place the membrane onto the wet thinset. Press the membrane into the thinset.
9. Continue this process throughout the entire floor. It’s fine to walk on top of the membrane immediately after installing. Make sure every bit of the floor is covered with thin set, then Ditra membrane. Also make sure that all of your seams are flat.
10. This is now the time to place the heating cables into the membrane. Ensure all power is turned off at the dedicated circuit; and that all sensors and cables pass testing with the electricians meter.
11. Cut a section of the Ditra membrane to allow the cold lead to conductor splice to sit flush under tile. The duct tape in this photo is only holding the wires in place. Once the thinset is applied, you’ll remove the tape.

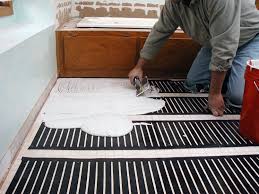
12. Lay the cable on the membrane in rows. Maintain 3 inches between cables and fixed features like walls, toilets, vanities, etc.
13. After you finish setting all the cables into the membrane, have you electrician test the different components to the floor heating system again with their special meter.
14. Once you know your electrical components are all in working order, you can begin installing your chosen tile. Using an unmodified thinset, adhere tiles to the membrane. First, entirely cover the membrane in mortar. Make sure to fill each space in the membrane. Then apply another layer of mortar as you apply the tiles to the floor.
I hope these tips on how to install heated flooring helps you! If you’re looking for more DIY projects, check out my post on how to install a sliding barn door like a pro!