
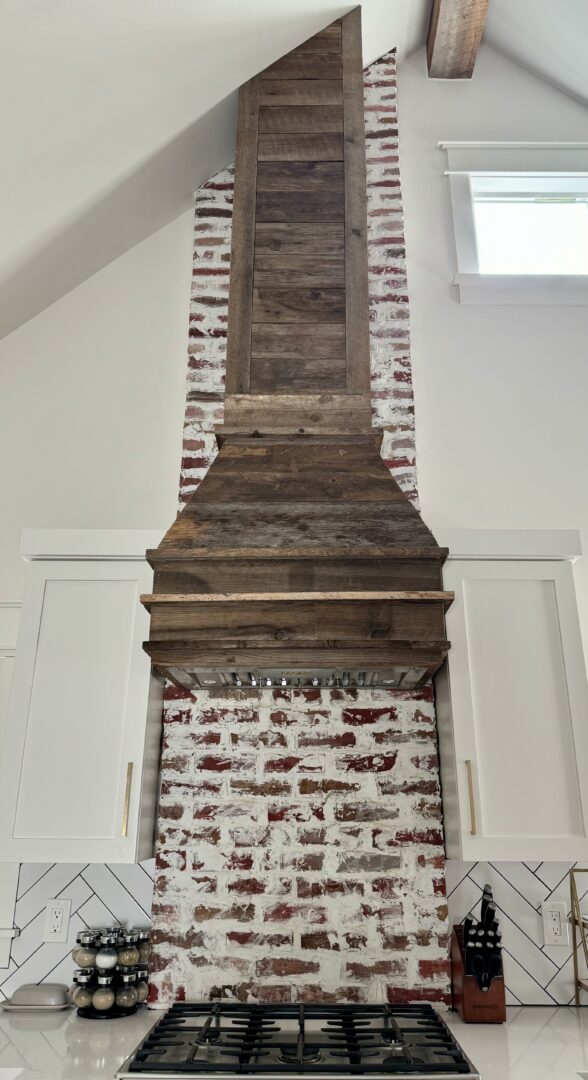
The German Schmear technique is a method of mortar washing that gives brickwork a rustic, old-world charm reminiscent of traditional European architecture. I’ve found it’s a fantastic way to update the appearance of a brick fireplace, accent wall, or exterior brickwork.
Follow along to see what I did to my daughter’s home. The brick went from drab to fab and made all the difference for the darling farmhouse. It’s really an easy technique. I’m excited to share with you exactly everything you will need to know to be able do the same thing.
The technique involves applying a thin layer of mortar over bricks, then partially removing it to let some of the original brick show through. This creates a variegated, textured effect that can hide imperfections and add character to a space. It’s so charming.
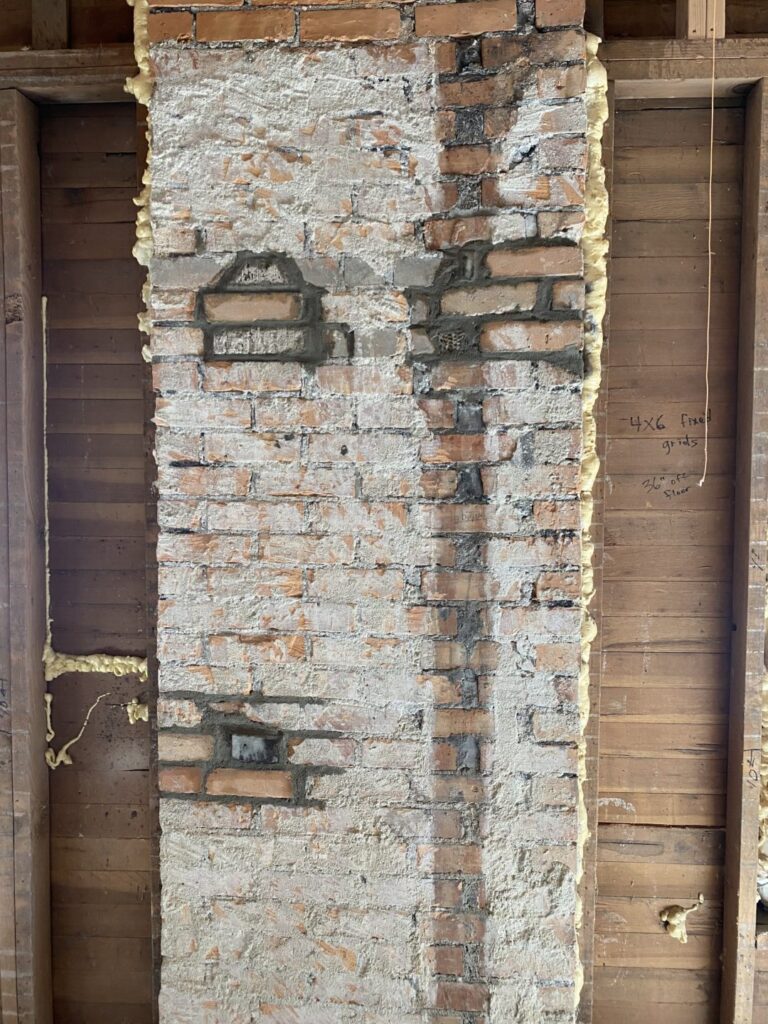
Let me back up a bit. My daughter’s house was a disaster when she purchased it. And by disaster, I mean it could have easily been knocked down because it was so neglected. Dirt was everywhere along with a lot of junk. Enter me and my daughter, Brooklyn, and our creative thoughts. The house is now completed and so dang cute. I will throw in a few before pictures so you get the idea. Here is what the brick looked like when we started. I had to spend a lot of time removing the plaster just to see what we were dealing with.
I had a lot of doubters who said there was no way this chimney could be made to look good. I love a challenge, so I set out to make it spectacular. Are you like me, or would you have thrown your hands in the air and walked away? My guess is you are reading this because DIY is in your blood. So, keep reading for the exciting steps that came next.
When my daughter saw the brick, she knew it was nothing she wanted to keep, at least not looking the way it did. To be honest, she was a little discouraged wondering how in the world we could salvage the beast.
The chimney was originally used to vent the furnace that heated the home. What made it even worse was the fact that the person who laid the brick didn’t do the best job. The mortar lines were thick in some spots, and thin in others.
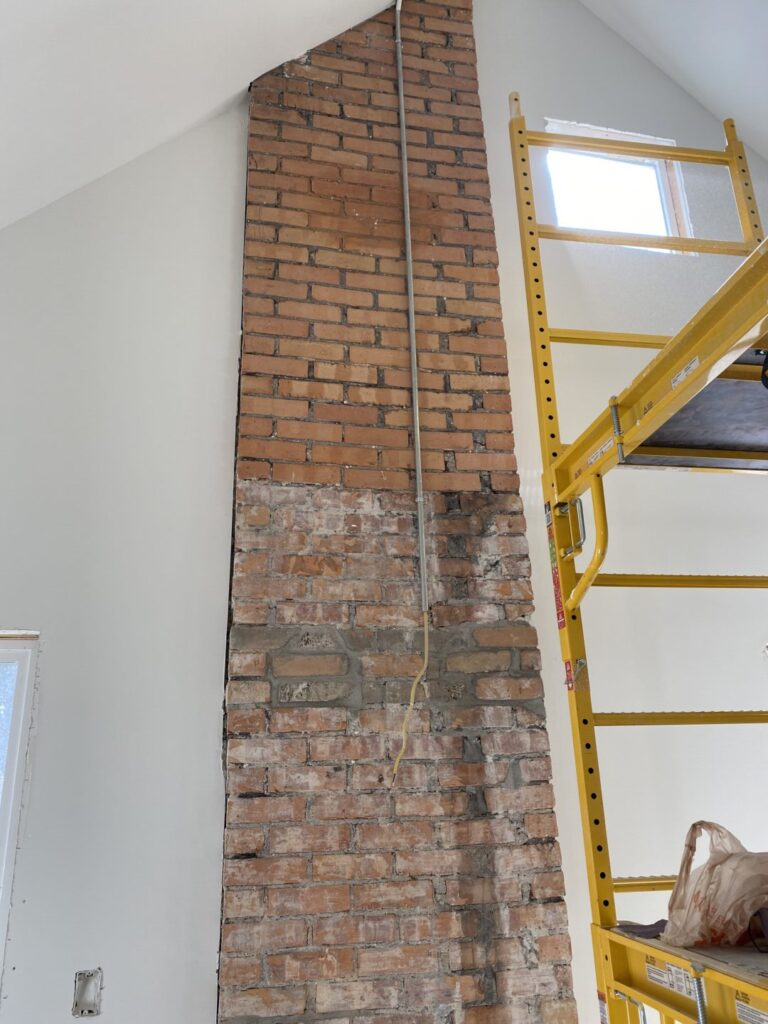
Also, the home originally had ceilings of 8 feet, but we decided to vault the ceiling. That meant the lower half of the chimney was dirty, polluted by years of coal and dust, while the upper half had never been seen. Probably even worse than those things was the fact the brick was a throwup yellow color. There was no way Brooklyn was going to have that in her home. And what my little girl wants, I’ll do whatever I can to help her achieve it.
If you don’t know, I have 3 daughters. While they are all grown and living on their own, they are still my little girls in my mind. I’m sure you feel the same about your kids. Family is the one thing I love more than DIY projects.
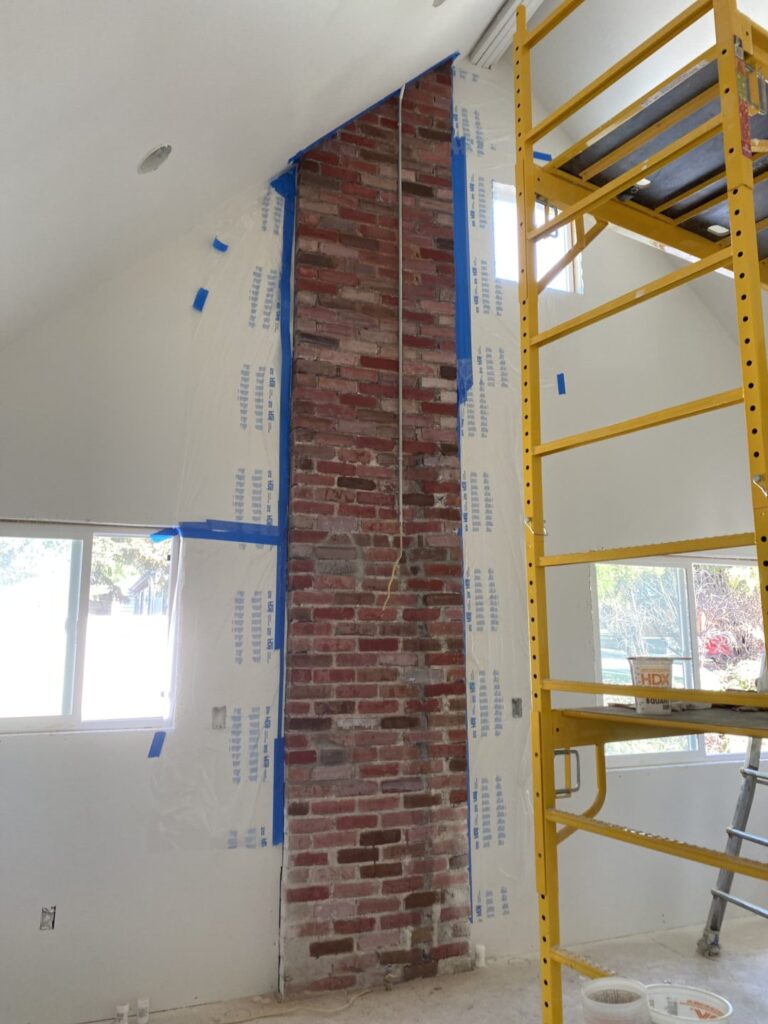
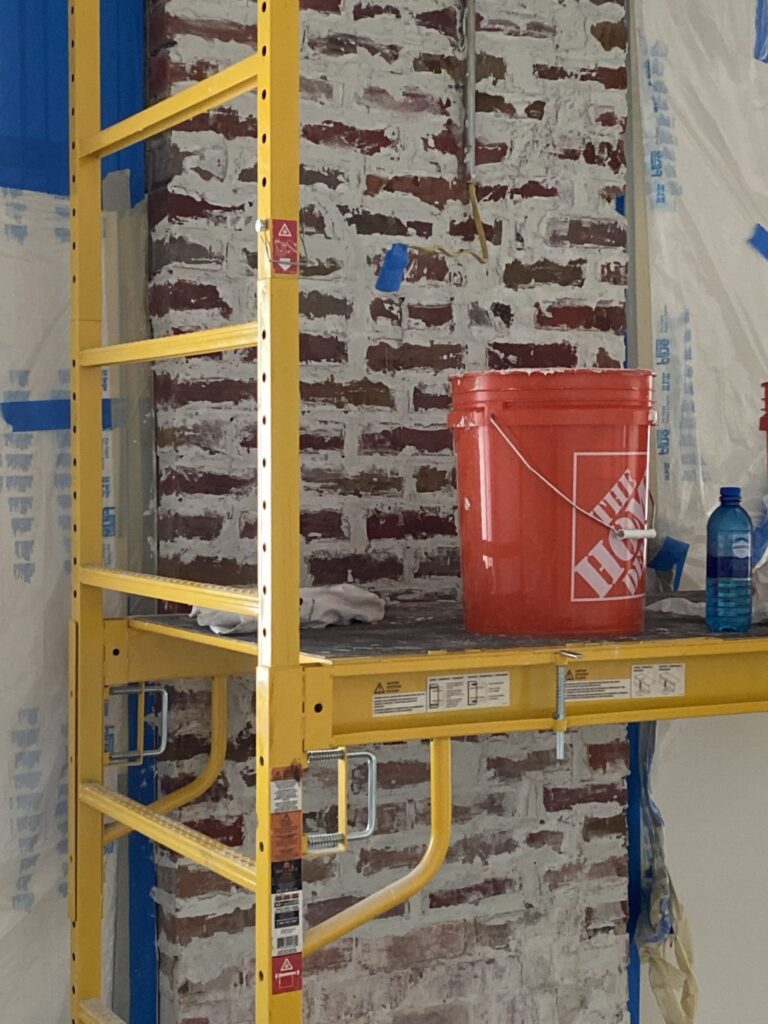
I first chose to dye the brick. The color scheme was all that was important. It didn’t have to look perfect because the final touch would come with the German Schmear. Here’s how it looked after I brushed, cleaned, and dyed the brick. Hard to believe it is the same chimney. Please note that the bottom 36 inches would be covered by the stove, so I didn’t pay much attention to it except to use it as a test for color and pattern.
I’m writing an article about how to dye brick. Look for it soon.
Implementing a DIY German Schmear is surprisingly straightforward, requiring just a few tools and materials. I typically start with a premixed mortar, water, a trowel, and a wire brush. Since I wasn’t sure the consistency needed for this chimney, I chose to mix the mortar myself. If you have never done this, don’t be intimidated. It’s actually fun.
The beauty of this project is its inherent flexibility; it caters to a range of aesthetics depending on how much mortar is removed and how much brick is exposed. With a little practice, I can achieve a finish that is uniquely tailored to any home’s style, and so can you!
As someone who values the satisfaction of completing home improvement projects with my own hands, mastering the German Schmear technique has been a rewarding endeavor. It has breathed new life into spaces without the need for extensive renovations. As a lover of anything vintage, I prefer to enhance instead of demolish.
The key to a successful application lies in patience and the willingness to experiment with mortar thickness and coverage until the desired look is achieved. I always recommend practicing on a small, inconspicuous section of brick before tackling a larger area.
Understanding the German Schmear Technique
The German Schmear technique is a method of mortar application that creates a rustic, old-world look on brick surfaces. It involves strategically smearing a mixture of mortar over bricks to partially cover them and enhance their aesthetic appeal.
Historical Significance
The German Schmear technique originates from Europe and has been used for centuries to protect and beautify brick masonry. It gained popularity for its ability to mimic the look of old and weathered walls commonly found in historical European architecture. I travel as much as I can and Europe is one of my favorites.
- Regions with High Usage: Northern Europe, particularly Germany
- Time Period of Origination: Approximately in the 18th century
My fascination with architecture and history draws me to appreciate the cultural connection represented by this technique. It also helps that my dad’s side of the family is German. I don’t speak a word of German, but knowing my ancestors came frome Deutschland, I had an advantage. At least that’s what I told myself while learning the process. I guess you can decide what you think when you see the finished project.
Method Overview
At its core, the German Schmear technique is a thin application of a wet mortar mix smeared onto brick. Here’s the process in a nutshell:
- Preparation of Bricks: Bricks must be clean and free of dust to ensure mortar adherence.
- Mortar Mixture: A specialized mortar mix is prepared, typically with a higher lime content for improved workability and a softer finish.
- Application Approach: Mortar is evenly applied and then partially removed with a trowel or cloth, revealing portions of the brick while maintaining coverage in mortar joints and selective brick areas.
- Finish Touch: The amount of brick exposed is subjective, allowing for personalized texture and look.
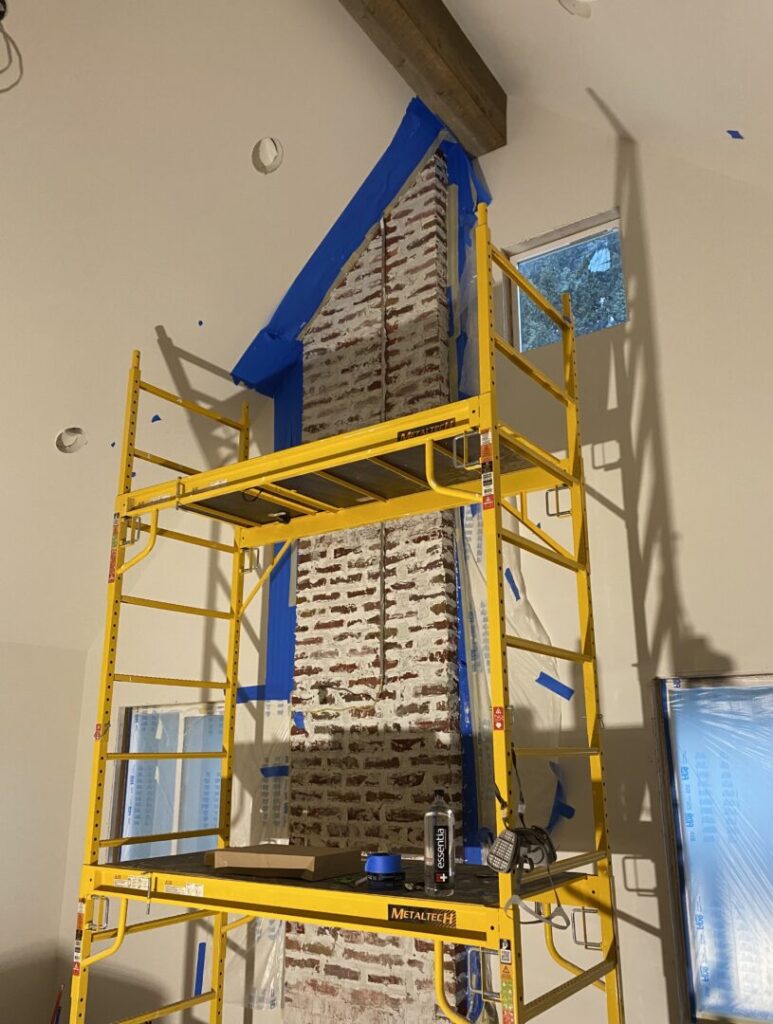
I note that the outcome is always unique, often influenced by the technique’s slight variations directed by the individual’s touch. Every DIYer is different, right? In the example shown in this post, the final look was decided by my daughter. After all, it’s her home and she would be the one looking at it every single day. Here’s how it looked about 20 minutes after we figured out the desired effect.
Preparation for DIY German Schmear
Before diving head first into the German Schmear technique on brick, it’s important to gather the proper tools and ensure safety measures are in place. A thorough inspection and cleaning of the brick surface is also crucial for a successful application. Nothing worse than climbing scaffolding only to have to climb back down because the area was prepped sufficently.
Tools and Materials
Tools needed:
- Mortar mix: For the schmear effect.
- Mason’s trowel: For applying the mortar.
- Wire brush or scrub brush: To clean bricks.
- Drop cloths: Protect surrounding areas.
- Bucket and water: For mixing mortar and cleaning.
Materials:
- Gloves: To protect hands during application.
- Safety goggles: To protect eyes from debris.
Safety Measures
When applying a German Schmear, I prioritize my safety by wearing appropriate gear.
- Protective gloves: Essential to prevent skin exposure to harsh materials.
- Safety goggles: Mandatory to shield eyes from any particles or dust.
- Respiratory protection: If working in a poorly ventilated area or sensitive to dust, a dust mask or respirator is vital.
Surface Inspection and Cleaning
To ensure the German Schmear adheres properly, inspect and clean the brick surface thoroughly.
- Visual Inspection: Check for damage or areas needing repair.
- Cleaning: Remove dirt, debris, and efflorescence with a wire brush followed by a gentle cleanser if necessary.
- Rinsing: Use water to rinse the brick surface, ensuring it’s clean but not saturated before applying the mortar.
Mixing the Schmear
In mixing the schmear for a German Schmear brick project, I focus on choosing the right type of mortar and creating the consistency that’s spreadable yet thick enough to stick to the bricks.
Choosing the Right Mortar
Mortar Type: It’s important for me to use a mortar mix that is typically used for masonry work. For an authentic German Schmear look, a Type N mortar mix is often recommended due to its medium strength, which is ideal for the application onto existing brickwork.
- Ingredients: Type N mortar is a blend of one part Portland cement, one part lime, and six parts sand.
- Color: While the natural color is usually sufficient, tints can be added to the mix for a custom look if desired.
Creating the Perfect Consistency
The consistency of the schmear is crucial for achieving the desired effect on the bricks. I aim for a consistency that is similar to thick peanut butter or cake frosting, which allows for easier application and adherence.
- Water Ratio: To start, I mix the dry mortar with water at a ratio of about 70% of the recommended amount on the packaging, slowly adding more until the desired thickness is reached.
- Mixing: I use a drill with a mixing paddle attachment to ensure an even mix, taking care to scrape down the sides of the bucket.
- Testing: Before I proceed, I test the mix on a small section of bricks to ensure it spreads well and achieves the look I want.
By following these specifics with attention to detail, the schmear is guaranteed to be ready for a successful application.
Application Process
In this section, I’ll take you through the precise steps to apply the German Schmear technique on brick, ensuring even coverage and desired texture.
Step-by-Step Guide
- Prepare the Area: I begin by laying down drop cloths and taping off areas I don’t want mortar on, including windows and trim.
- Mix the Mortar: I mix the mortar to a thick, peanut butter-like consistency. It needs to be thick enough to adhere to the bricks without dripping.
- Moisten the Bricks: Before applying mortar, I lightly spray the brick surface with water to help the mortar bond to the bricks and prevent it from drying too quickly.
- Apply Mortar: Using a trowel, I apply the mortar to a small section of the brick, spreading it with a gloved hand or a grout sponge to work it into the crevices.
- Remove Excess Mortar: After mortar sets slightly, I use a scraper or a stiff brush to remove excess mortar, achieving the desired look where more brick color shows through.
- Continue in Sections: I continue repeating these steps section by section to ensure I maintain consistency throughout the application process.
- Clean Up: Once I’m satisfied with the application, I clean any excess mortar off adjacent surfaces and remove all protective sheeting.
Tips for Consistency
- Mortar Mix: I ensure consistency in my mortar mix by measuring out the water and dry mortar using a bucket for each batch.
- Application Method: I apply the mortar using the same amount of pressure and thickness across all sections, being careful to replicate the pattern for a uniform look.
- Timing: I keep a close eye on the time, only working on manageable sections to avoid the mortar drying out too fast and becoming difficult to work with.
- Tool Use: I use the same tools throughout the application and make sure they’re clean before starting a new section to avoid unwanted texture changes.
Styling Techniques
When creating a German Schmear on brick, I focus on a look that enhances the natural charm of the brickwork. Texture and color are the main components to achieve the desired aesthetic.
Texture Variations
- Smooth Finish: I apply the mortar wash evenly across the brick surface for a refined look.
- Rustic Finish: By leaving the mortar thicker in some areas and thinner in others, I create an aged, weathered effect.
Moreover, I use specific tools to create distinctive textures:
- Trowels: For a more controlled, smooth application.
- Brushes: To add subtle texture and to work the mortar into the brick joints for a cohesive look.
- Sponges: For dabbing away excess mortar for a varied texture.
Color Blending Options
The choice of mortar color greatly impacts the final appearance. I carefully select and blend to complement or contrast the existing brick. My typical mortar color choices include:
- Classic White: A bright, clean look that feels fresh and modern.
- Antique Cream: Adds warmth and a vintage feel.
To achieve a more personalized color blend, I may mix in:
- Tones of gray for a cooler effect.
- Hints of beige for a softer, more natural appearance.
Experimentation with color mixing ratios is crucial for a unique result. I test blends on a small, inconspicuous section of the brick to ensure satisfaction with the color before applying it to a larger area. Don’t be afraid to be unique!
Drying and Curing Time
After I apply a German Schmear technique to brick, it’s crucial to understand the required time for the material to set properly. I must consider factors like mortar mix, environmental conditions, and brick absorption to ensure a durable finish.
Post-Application Guidelines
- Initial Set: The mortar typically becomes touch-dry within 24 hours. However, I should avoid any contact that could disturb the finish.
- Full Cure: It can take approximately 28 days for the mortar to fully cure. The exact time depends on the thickness of the application and the ambient conditions. During this period, I keep the bricks dry and at a stable temperature.
- Environment Factors: If I’m working in a high humidity environment or at low temperatures, I may need to wait longer than 28 days for the mortar to fully cure. Conversely, in hot and dry conditions, I must ensure that the mortar doesn’t dry out too quickly, as this can lead to cracking.
Routine Cleaning
For routine cleaning, I recommend:
- Dusting: I use a soft-bristle brush to gently remove any surface dust or cobwebs from my brickwork.
- Washing: When a deeper clean is necessary, I mix a solution of mild dish soap and warm water.
- I apply it with a sponge in a circular motion and rinse with a spray bottle.
- Mold and Mildew: If I notice any mold or mildew spots, I prepare a solution consisting of one part bleach to ten parts water.
- I apply it to the affected areas using a spray bottle before scrubbing lightly with a brush and rinsing thoroughly.
Repair and Touch-Up
For repair and touch-up tasks, here’s a guideline I follow:
- Inspection: I perform a regular inspection at least once a year for any cracks or areas where the mortar may have chipped away.
- Preparation: Before applying new mortar, I ensure that the area is clean and damp for better adhesion.
- Application: Using a trowel, I apply the mortar mixture in layers.
- I make sure to match the texture and color of the existing German Schmear.
- Curing: After the touch-up, I keep the repaired area moist by lightly misting with water over the course of a few days to prevent premature drying and cracking.
Troubleshooting Common Issues
When applying a German Schmear technique to brick, I occasionally run into a couple of common issues: uneven application and moisture concerns. Understanding how to address these will yield a flawless finish.
Uneven Application
Sometimes, I notice that the mortar isn’t spread evenly across the brickwork. This is often due to rushing the process or applying the mortar inconsistently. Here’s how I address it:
- Identify the Problem Areas: I look for places where the mortar is too thick or too thin.
- Adjust the Technique: I apply more mortar to areas where it’s too thin, and carefully remove excess where it’s too thick using a damp sponge.
- Consistent Pressure: I ensure to apply consistent pressure when spreading the mortar to prevent future unevenness.
Moisture Concerns
Moisture can cause the mortar to not adhere properly or lead to long-term issues like mold. Here are the steps I take to mitigate moisture problems:
- Proper Drying Time: I always allow the brickwork to dry completely before applying the mortar.
- Check the Weather: I plan the project for a dry period and avoid high humidity days.
- Ventilation: If I’m working indoors, I make sure the area is well-ventilated to aid in the drying process.
Final Thoughts
Applying a German Schmear to a brick surface has the potential to utterly transform a space with a classic, antiquated charm. In my experience, the key to a successful project lies in preparation and patience.
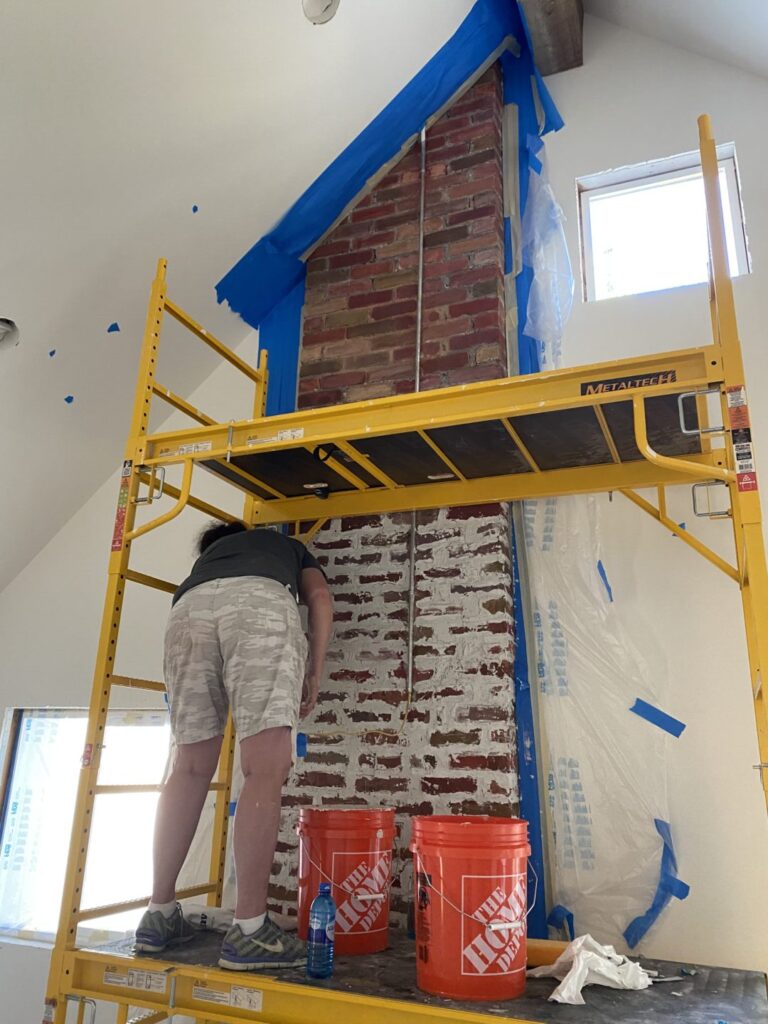
I recommend working methodically, focusing on small areas at a time to maintain control over the finished look. In the case of this project, it helped to have my daughter present. While I was doing the work, she was giving me instructions for a little less or a little more whereever she wanted it. She’s pretty picky, so I did what she asked. But, I think the project was a huge success. Who cares what I think? As long as my daughter was happy, I was happy.
Sorry for the butt shot, but I am glad my daughter took this pic. It shows you the progress. I often work from the top down, but since we had used the area at the bottom as a test area, it was easier to work my way up to keep the look consistent.
- Materials Needed:
- Joint compound or mortar mix
- Spatula or trowel
- Wire brush
- Drop cloths
- Painter’s tape
Following these steps ensures a smoother process:
- Prep Work: It’s vital to cover and protect surrounding areas before starting.
- Mixing: Achieving the perfect consistency in your mix can make or break the project.
- It should be spreadable but not runny.
- Application: Use a trowel or hands to apply the mix, working it into the brick crevices for a natural look.
- Wiping: For a subtler effect, wipe away excess with a damp cloth shortly after application.
I underscore the importance of allowing the German Schmear to cure properly before deciding if another layer is needed.
Lighting plays a significant role in how the colors appear, so I recommend evaluating the result at different times of the day.
With attention to detail and a steady approach, DIY enthusiasts like me and you can achieve professional-looking results. I worked until the sun was setting and the project was finished. When we shut the door, my daughter said thank you, told me she loved it, and gave me a big hug. Needless to say, I smiled the whole hour long drive from Salt Lake City to the mountains where I live.
This technique is forgiving, and small blemishes often contribute to the overall rustic appeal, so I encourage you not to fret over perfection. Really, don’t sweat it! For this project, since the brick was so rough, we knew an imperfect look was exactly what we wanted.
Embrace your project’s unique character, and you’ll be rewarded with a stunning feature in your home.

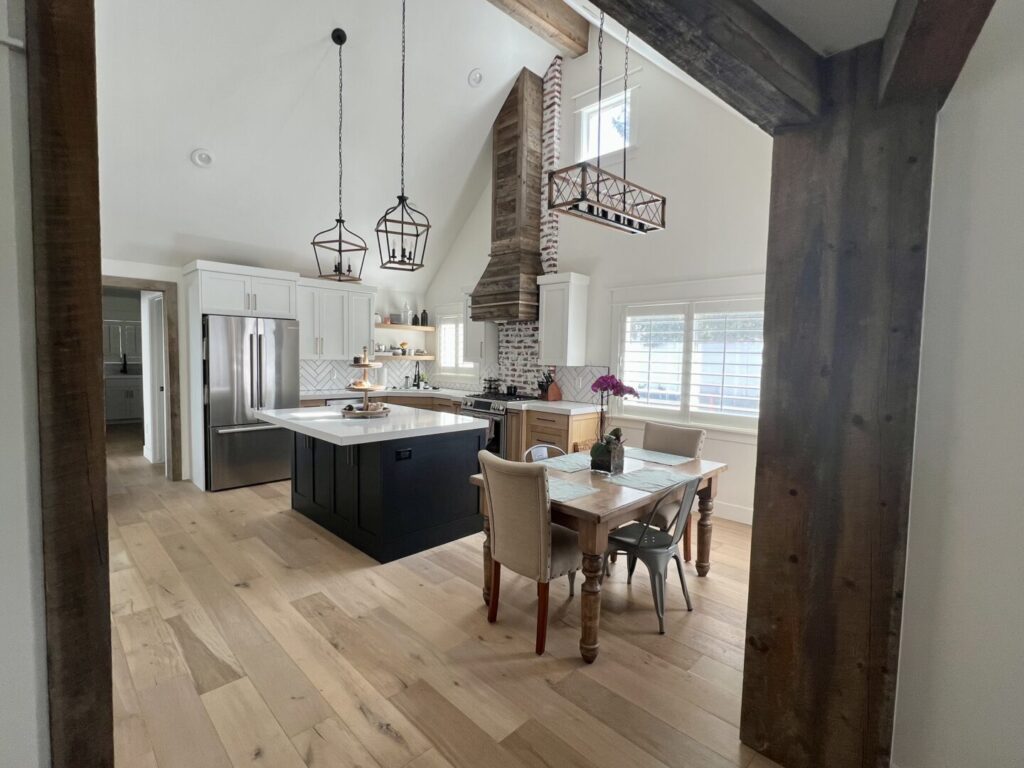
Do you like the wood posts and beams? They were salvaged from a 100 year old cabin in Utah. I was happy to give them to Brooklyn because I knew they would be perfect for her house. You should have seen her face when she saw them installed. It’s feel-good moments like that why I love renovating homes. On a side note, I also made the table for her as a gift a few years ago.
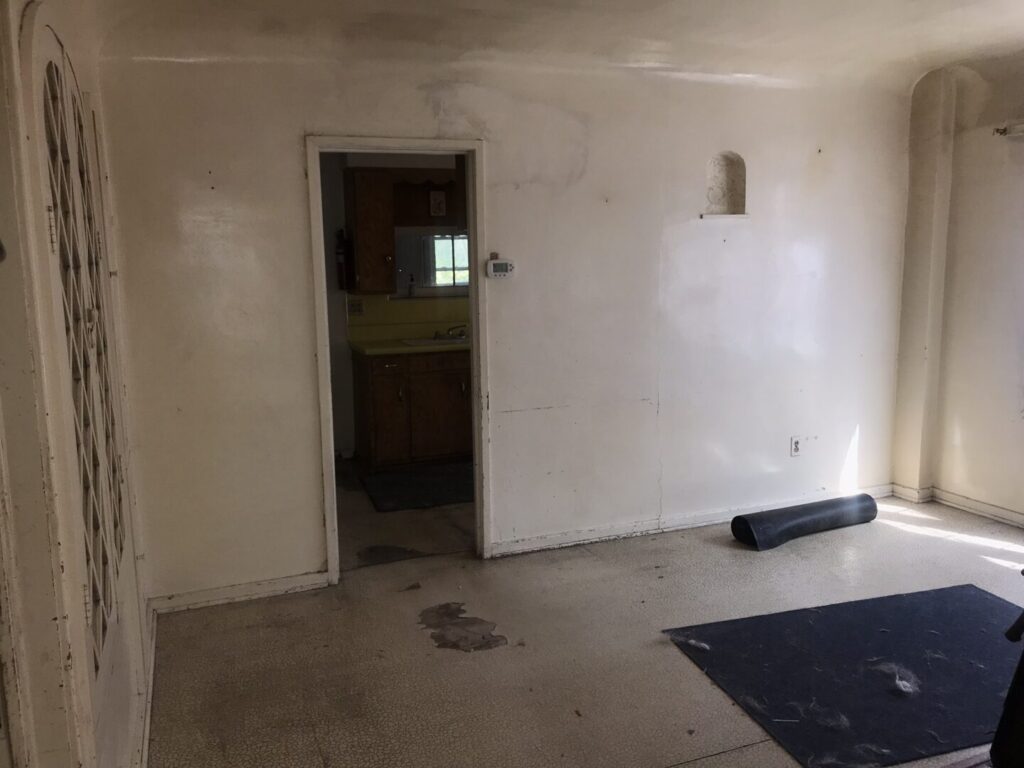
In case you are curious to see what this area looked liked when she bought the home, here you go. The transformation was dramatic. We removed the wall between the original eating area and the kitchen and vaulted the ceiling.
Hope you enjoyed following along. Give your brick a new look with a German Schmear. This was a labor of love from my girl. Her entire house was renovated, so look for more fun ideas coming soon.
As always, feel free to reach out to me, or leave a comment. I’m happy to chat with you and curious what your latest DIY is.
~*JJ*~