The days are getting cooler and the nights are getting colder and you know what that means: the holiday season is quickly approaching, Thanksgiving especially! Soon, you’ll be entertaining guests regularly, starting in the month of November and everyone will be looking at your house and it’s decorations! It’s up to you to make sure your home is perfectly festive and perfectly tasteful. So how about getting ready for the dinner crowd with a few Thanksgiving wood crafts? Ones that are easy, decorative, and inexpensive? Sound good? Great! Then it’s time to get started on some of my very favorite Thanksgiving wood crafts.


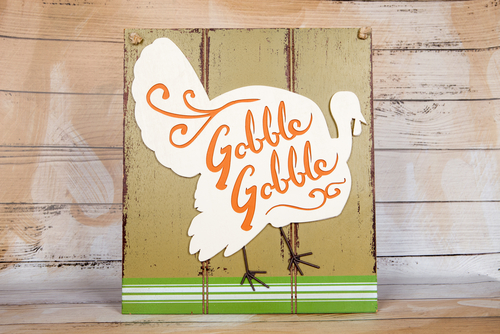
“Gobble Gobble” Wooden Sign
Attach 3 weathered (I like to use weathered wood, it gives the craft more of a rustic vibe!) 2x4s together for this Thanksgiving wooden craft. If you wish, you can use a layer of wide Washi tape to create the green detailing around the bottom, but I elected to skip this step! Once attached, use your Cricut to design a Thanksgiving turkey with your desired message displayed over top. Just make sure that your vinyl piece is aligned perfectly before you permanently place the turkey on the wood.


Thanksgiving Block Turkey
Similar to the reversible holiday blocks that I featured above, you can use a painted 2×2 cut to a 3 1/2 wooden block to create a turkey, as well! The cool thing about these wooden turkeys is that they double as place cards, as well! Paint the 2×2 block in a dark brown color. This will be the body of your Turkey. Next, cover seven popsicle sticks in a layer of festive washi tape, writing the name of your guest along the feathers. Set aside. Next, use your Cricut to design the facial features of your turkey. Attach the vinyl pieces to the block, smoothing the edges out with a credit card to fix any wrinkles. Finish things off by attaching your turkey feathers with hot glue. Find the full tutorial here.
Reversible Holiday Blocks
I made these holiday blocks a few years ago, and they’ve been one of my favorite holiday home decor pieces ever since! It was the perfect weekend craft activity and it took me an afternoon to bring this wooden craft to life. For the colored background, I adhered holiday scrapbook paper directly to my wooden blocks using Mod Podge (after I stained them, of course). Next, I used my Cricut to create the vinyl lettering. You can find my full tutorial here!
Painted Wood Pumpkin Slice
For a cute craft that’s appropriate throughout fall, try this DIY painted wood pumpkin slice. Paint a wooden plaque with orange acrylic paint. Leave an inch or two of unpainted wood around the edges of the bark to give the pumpkin an artsy finish. While your orange paint is drying, paint three Balsa wood sticks with brown acrylic paint. Once dry, cut the Balsa sticks to create a pumpkin “stem.” Make sure that your orange acrylic paint is completely dry before hot gluing the Balsa sticks to the pumpkin. Use a length of curled floral wire for an easy finishing touch! Full tutorial here.

