

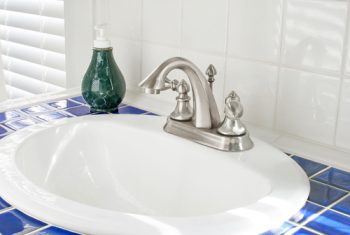
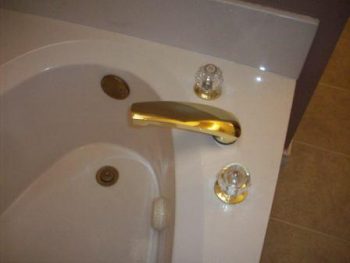
Out-of-date hardware can make your entire home look decades older than it really is. We had gold hardware in our bathroom for the longest time and I never understood why the previous owners thought that was a good idea. It made our bathroom look positively ancient, which made it my least favorite room in the entire house! Finally, one day, I had had enough! It was time to find a quick fix that would make the bathroom look better, it was time to cover them with a layer of spray paint! I spent the afternoon tackling my hardware paint DIY project and after only a few hours of hard work, I was done! My new hardware looked absolutely incredible and my bathroom hardware looked much newer in turn. If you’re looking for similar hardware paint DIY, check out my quick tutorial!
Here’s What You’ll Need:
-Spray paint suitable for metal
-A set of old or ancient hardware (this shouldn’t be too tricky to find, you probably won’t even have to leave your bathroom!)
Step One: Remove the hardware from your kitchen sink or bathtub. Using a wire brush or a sanding block on the hardware to give the spray paint a gritty surface to adhere to. This is the easiest part of the hardware paint DIY.
Step Two: Now that your hardware has been adequately sanded, you will want to give it a good cleaning to remove any dirt, grime or dust from the surface. Use an old shirt or an old towel to thoroughly clean the surface of your hardware. If you choose not to clean your surface, you are more likely to end up with a poorer finish because the dust and dirt particles will show up through the paint. Be sure to wear gloves if your cleaner is harsh, or you could risk burning or irritating the skin of your hands! Wait for your hardware to fully dry before moving on to the next step of this hardware paint DIY.

Step Three: Now that you’ve cleaned and sanded your hardware, you can move on to the painting portion of this project! Make sure that you spray paint outside, or in a well-ventilated area and on a drop cloth of sorts for easier cleanup. Follow the directions on the back of the spray paint can and make sure you shake it thoroughly for a smooth finish. For the first layer, I recommend that you apply a light coat of spray paint, followed by a heavier second coat after the first coat dries. Typically, each layer of paint takes about 10 minutes to dry. Make sure your paint fully dries before attaching them to back to your bathroom sink or bathtub!
I read your post but never comment…SO…….I love me some spray paint! And this is a great fix! The key is in the prep. Sanding to give some “tooth” is the only way the paint is going to adhere! And changing out the hardware on cabinets can help update as well! It’s amazing what you can do inexpensively to update the bath!